A Builder's Tour of Automerge
Automerge is a suite of tools for building local-first web applications with real-time synchronization that works on and offline.
In this tutorial, you'll build a local-first multiplayer app with TypeScript, React, Vite, and Automerge. You'll discover how to:
- Represent data as Automerge Documents
- Change documents' data and merge changes from different peers
- Store & synchronize a set of documents in an Automerge Repository
- Build a multiplayer realtime web app with the Automerge React client
Setup
All the code here can be found at the automerge-repo-quickstart repo.
To get started:
- clone the tutorial project from automerge-repo-quickstart
- in the
automerge-repo-quickstartdirectory, install the project dependencies - start the local Vite development server
- npm
- yarn
$ git clone https://github.com/automerge/automerge-repo-quickstart
# Cloning into 'automerge-repo-quickstart'...
$ cd automerge-repo-quickstart
$ npm install
# ...installing dependencies...
$ npm run dev
$ git clone https://github.com/automerge/automerge-repo-quickstart
# Cloning into 'automerge-repo-quickstart'...
$ cd automerge-repo-quickstart
$ yarn
# ...installing dependencies...
$ yarn dev
Visit localhost:5173/automerge-repo-quickstart/ to see the app in its "starter" state, as a basic React app not yet using Automerge: the task list can be edited, but changes are not synced between users, and all local changes are lost when the page is closed or reloaded.
Let's fix all that with Automerge!
In the exercises that follow, you'll modify the source code to:
- Configure a Repository to store & sync document changes locally
- Create/retrieve a task list Document by its Document URL
- Use the Automerge React client to update the Doc's data on user input
- Update the Repo to also sync changes over the network (when available)
Architecture of an Automerge App
Building apps with Automerge requires familiarity with two key concepts: Documents and Repositories.
- An Automerge Document (Doc) models app data using a specialized data structure that supports conflict-free collaboration via git-like merges.
- An Automerge Repository (Repo) determines how/where the app stores and synchronizes those documents, locally and/or over the network.
Automerge is built in Rust, but stack-agnostic and useful for building apps on any platform, with client libraries for many popular languages/frameworks.
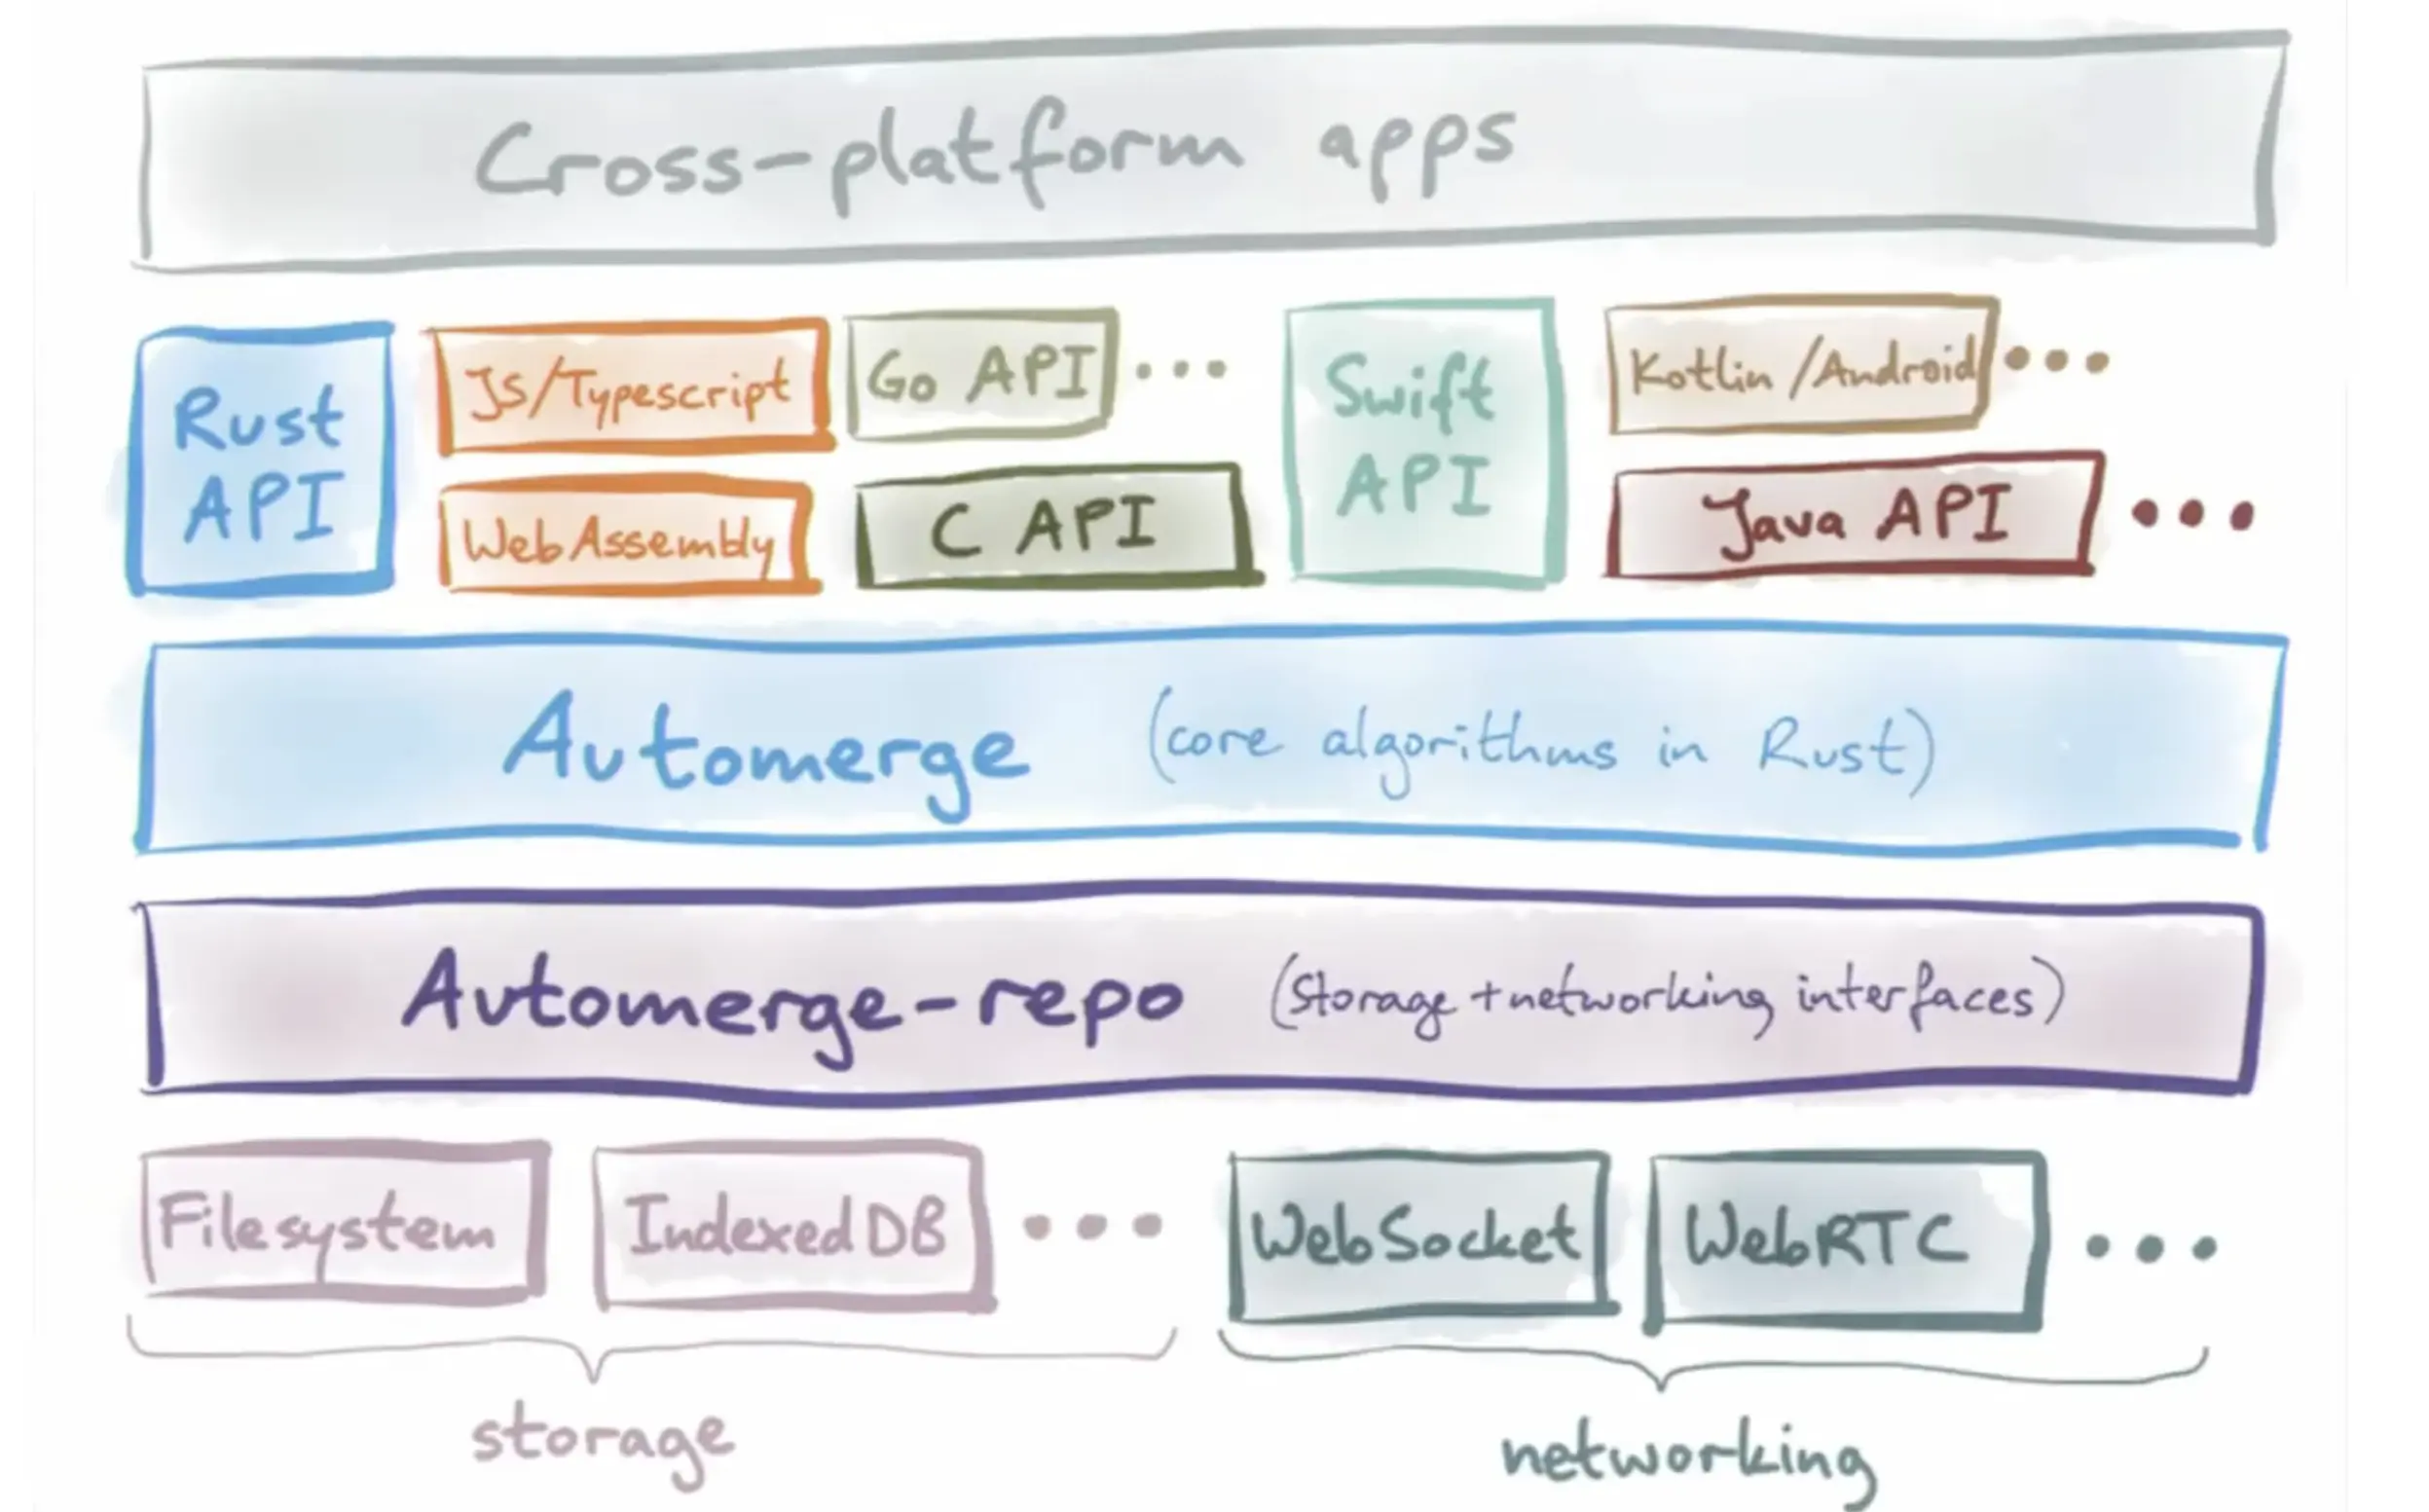
The foundational Document data structure & related algorithms are defined in the @automerge/automerge core library, which used under the hood by the @automerge/automerge-repo library, which exposes the practical conveniences for managing documents via a Repo.
Manage docs with a Repo
A Repo keeps track of all the documents you load and makes sure they're properly synchronized and stored. It provides an interface to:
- create, modify, and manage documents locally
- send & receive changes to/from others, and
- merge multiple changes as needed.
Each Repo needs to know:
- Where its documents should be saved, specified via a
StorageAdapter - How/Where to send, retrieve, and synchronize doc updates, specified via zero or more
NetworkAdapters
The Repo constructor from @automerge/automerge-repo lets you create & configure a Repository, specifying the StorageAdapter and NetworkAdapter(s) you need.
Those adapters can be imported from their respective @automerge/automerge-repo-storage-* and @automerge/automerge-repo-network-* packages.
If none of the pre-built adapters fit your needs, you can create custom adapter(s) as needed.
Storage & Network Adapters
Currently, the task list app doesn't persist or sync any changes, even locally.
To prepare to add local multiplayer capabilities to the app, you'll initialize a local-first Repo to:
- save Docs client-side in the browser's IndexedDB, using the
IndexedDBStorageAdapterfrom@automerge/automerge-repo-storage-indexeddb - keep local users (i.e. tabs within the same browser/origin) in sync via a Broadcast Channel, using the
BroadcastChannelNetworkAdapter.
Import your storage & network adapters
In src/main.tsx, import and instantiate an IndexedDBStorageAdapter and BroadcastChannelNetworkAdapter from their @automerge/automerge-repo-* packages, which have already been included in the project dependencies.
Solution
import React from 'react'
import ReactDOM from 'react-dom/client'
import App from './App.tsx'
import './index.css'
import { IndexedDBStorageAdapter } from "@automerge/automerge-repo-storage-indexeddb"
import { BroadcastChannelNetworkAdapter } from '@automerge/automerge-repo-network-broadcastchannel'

const broadcast = new BroadcastChannelNetworkAdapter();
const indexedDB = new IndexedDBStorageAdapter();

ReactDOM.createRoot(document.getElementById('root')!).render(
  <React.StrictMode>
    <App />
  </React.StrictMode>,
)
Initialize your Repo
Using the Repo constructor from @automerge/automerge-repo, initialize your new repo by passing in the given adapters as the storage and network properties of the options object accepted by the constructor.
Solution
import React from 'react'
import ReactDOM from 'react-dom/client'
import App from './App.tsx'
import './index.css'
import { IndexedDBStorageAdapter } from "@automerge/automerge-repo-storage-indexeddb"
import { BroadcastChannelNetworkAdapter } from '@automerge/automerge-repo-network-broadcastchannel'
import { Repo } from '@automerge/automerge-repo'

const broadcast = new BroadcastChannelNetworkAdapter();
const indexedDB = new IndexedDBStorageAdapter();

const repo = new Repo({
  storage: indexedDB,
  network: [broadcast],
})

ReactDOM.createRoot(document.getElementById('root')!).render(
  <React.StrictMode>
    <App />
  </React.StrictMode>,
)
Repos in React: RepoContext
The @automerge/automerge-repo-react-hooks package provides some React-specific conveniences for working with Automerge repositories.
A RepoContext makes your repo and its documents available throughout your React application, via useRepo and useDocument hooks which can be called in any client component.
Add a RepoContext to the React app
In main.tsx, import RepoContext and modify the React.render() call to wrap the App component with a RepoContext.Provider, passing in your fresh new repo to the context's value prop.
Solution
import React from 'react'
import ReactDOM from 'react-dom/client'
import App from './App.tsx'
import './index.css'
import { IndexedDBStorageAdapter } from "@automerge/automerge-repo-storage-indexeddb"
import { BroadcastChannelNetworkAdapter } from '@automerge/automerge-repo-network-broadcastchannel'
import { Repo } from '@automerge/automerge-repo'
import { RepoContext } from '@automerge/automerge-repo-react-hooks'

const broadcast = new BroadcastChannelNetworkAdapter();
const indexedDB = new IndexedDBStorageAdapter();

const repo = new Repo({
  storage: indexedDB,
  network: [broadcast],
})

ReactDOM.createRoot(document.getElementById('root')!).render(
  <React.StrictMode>
    <RepoContext.Provider value={repo}>
      <App />
    </RepoContext.Provider>
  </React.StrictMode>
)
Doc Handles & URLs
A Repo isn't very useful until it has some documents in it! To create a new document, pass its initial value to repo.create(), which accepts a type parameter with the expected document schema:
const listHandle = repo.create<TaskList>({
  tasks: [
    {
      title: 'Learn Automerge',
      done: false
    }
  ],
});
The object returned from repo.create() is a DocHandle, which provides an interface for working with the document.
A DocHandle's .url property provides the document's unique identifier:
listHandle.url // automerge:37Qr33Ub26dnS2txNCjEJDC37KFT
To retrieve a handle for a document that's already in your repo, you can pass its document URL to repo.find():
const existingDocHandle = repo.find(existingDoc.url)
It's common practice to pass document URLs around as URL hashes. For example:
http://my-automerge-app.com/automerge-repo-quickstart/#automerge:37Qr33Ub26dnS2txNCjEJDC37KFT
The automerge-repo package exports an isValidAutomergeUrl() function that you can use to determine if a given hash is a valid Document URL.
In your task list app, you'll check the page's hash and:
- retrieve the existing task list document if it exists, or
- create a new document if we don't have one already.
Create/Find a Document
- Check the page's URL hash (
document.location.hash), if any, to see if it contains a valid Automerge document URL. (You'll need to strip off the leading#first.) - If so, pass the doc URL to
repo.find()to retrieve the document's handle. - Otherwise, create a new document with
repo.create()and set its document URL in the page's URL hash.
(Note: In a production app you'd probably handle routing differently, but this is enough for our example.)
Solution
import React from 'react'
import ReactDOM from 'react-dom/client'
import App, { type TaskList } from './App.tsx'
import './index.css'
import { Repo, isValidAutomergeUrl } from '@automerge/automerge-repo'
import { BroadcastChannelNetworkAdapter } from '@automerge/automerge-repo-network-broadcastchannel'
import { BrowserWebSocketClientAdapter } from '@automerge/automerge-repo-network-websocket'
import { IndexedDBStorageAdapter } from "@automerge/automerge-repo-storage-indexeddb"
import { RepoContext } from '@automerge/automerge-repo-react-hooks'

const repo = new Repo({
  network: [new BrowserWebSocketClientAdapter("wss://sync.automerge.org"), new BroadcastChannelNetworkAdapter()],
  storage: new IndexedDBStorageAdapter(),
})

const rootDocUrl = document.location.hash.substring(1)

let handle
if (isValidAutomergeUrl(rootDocUrl)) {
  handle = repo.find(rootDocUrl)
} else {
  handle = repo.create<TaskList>({
    tasks: [
      {
        title: 'Learn Automerge',
        done: false
      }
    ],
  });
}

document.location.hash = handle.url

ReactDOM.createRoot(document.getElementById('root')!).render(
  <React.StrictMode>
    <RepoContext.Provider value={repo}>
      <App />
    </RepoContext.Provider>
  </React.StrictMode>,
)
Read & edit a Document
Docs in React: useDocument
Once you have the URL of the document you want to work with, you can access & modify it from your components with the useDocument hook from automerge-repo-react-hooks.
Similar to React's useState, useDocument returns a two-item array with a reactive doc value representing the document's current contents and a changeDoc function which can be used to update that value.
Access the given document in the App component
Update the App component in src/App.tsx to accept a docUrl prop. In src/main.tsx, pass in the URL of the created/retrieved document to the App component.
Solution
// ...
import { useState } from 'react'
import type { AutomergeUrl } from '@automerge/automerge-repo';

// ...

function App({ docUrl }: { docUrl: AutomergeUrl }) {
  // ...
}

export default App
// ...

document.location.hash = handle.url

ReactDOM.createRoot(document.getElementById('root')!).render(
  <React.StrictMode>
    <RepoContext.Provider value={repo}>
      <App docUrl={handle.url} />
    </RepoContext.Provider>
  </React.StrictMode>,
)
Load the task list document
In App.tsx, replace the call to the useState hook with a call to useDocument that retrieves the document & change function for the given docUrl.
Solution
// ...
import { useDocument } from '@automerge/automerge-repo-react-hooks'
import type { AutomergeUrl } from '@automerge/automerge-repo'

// ...

function App({ docUrl }: { docUrl: AutomergeUrl }) {

  const [doc, changeDoc] = useDocument<TaskList>(docUrl)

  // ...
}

export default App
Read a document's contents
The doc value returned by the hook will initially be undefined while the document is loading. Once loaded, doc will have the shape of the Document you specified, and will update reactively every time the document changes.
In App.tsx replace the page header text. Use the doc value to make the title display the total number of tasks currently in the list (remember to handle the undefined loading case).
// ...

function App({ docUrl }: { docUrl: AutomergeUrl }) {
  const [doc, changeDoc] = useDocument<TaskList>(docUrl);

  return (
    <>
      <header>
        <a href="https://automerge.org" target="_blank">
          <img src={automergeLogo} className="logo" alt="Automerge logo" />
        </a>
        <h1>
          {doc ? doc.tasks.length : 'Loading'} Tasks
        </h1>
      </header>

      {/* ... */}
    </>
  )
}
Documents vs. JS Objects
Although they look as simple as Plain Old JavaScript Objects (POJOs), Automerge Documents are much more powerful.
As changes are made to a Document's data, those changes are stored along with the data itself, and can be "undone", "replayed", and synchronized with other changes made to the same document.
The useDocument hook is aware of the repo in use (thanks, RepoContext!), so whenever a document is changed, its new value will be saved in the given StorageAdapter(s) and synced to other users via the given NetworkAdapter(s).
Edit a document
The changeDoc function returned by the useDoc hook allows us to update the given document as needed, usually in response to user action.
changeDoc accepts a callback representing the change to be applied to the existing document, which is passed as the callback's first argument. For example:
// Mark the first task as completed:
changeDoc(d => d.tasks[0].done = true)

// Delete all tasks, resetting the list to empty:
changeDoc(d => d.tasks = [])
This type of reassignment in the change handler works well for simple values like a boolean, but not so well for changing text - e.g. to update the .title of the task.
Instead of reassigning string values, use the updateText() function from @automerge/automerge to change string values more efficiently, with additional advantages such as the ability to merge substring-level edits.
Automerge Documents are immutable, so each change creates a new document while the original document remains unaltered.
import {updateText} from '@automerge/automerge/next'

// updateText() is Automerge's efficient way to track string edits
const renamed = updateText(
  list.tasks[0], // the (sub) document to update
  ['title'], // array representing the path to the text to update
  'Learn more Automerge' // the new text value
);

console.log(renamed.tasks[0].title)
// 'Learn more Automerge'

console.log(list.tasks[0].title)
// 'Learn Automerge' (original doc not modified)
Collaboration in Automerge
As the name implies, one of the key powers of Automerge is its ability to merge different changes to a given document, much like git lets you merge multiple edits to a given file.
When merging different changes to the same property, Automerge uses various strategies to avoid conflicts and ensure that the merged document will be identical for every user.
This makes Automerge an ideal tool for building collaborative apps that let multiple users work together on the same documents (with or without a network connection).
Collaborating Locally
Since the Repo in this app uses a BroadcastChannelNetworkAdapter, any changes made to documents in that Repo sync automatically to all other clients with the same origin (i.e. tabs within the same browser) who know the given document's URL (its unique identifier).
Open a second tab with the same URL and edit the list, and you'll see the first tab's list updated accordingly. If you close all the tabs and reopen them, the document is preserved, as it is stored in your browser's IndexedDB.
That's right, you've already built a working Automerge-backed React app with live local synchronization! Congrats!
Collaborating over the internet
In addition to syncing changes locally, changes to an Automerge Repo can be synced with other remote users by configuring a suitable NetworkAdapter, e.g. BrowserWebSocketClientAdapter. Multiple network adapters can be configured for the same Repo, so that e.g. local sync will continue working even if the network is unavailable.
Add a BrowserWebSocketClientAdapter
To add a websocket network adapter to the Repo, first install the @automerge/automerge-repo-network-websocket package to the project dependencies.
Solution
- npm
- yarn
$ npm i @automerge/automerge-repo-network-websocket
$ yarn add @automerge/automerge-repo-network-websocket
Then, import and initialize the BrowserWebSocketClientAdapter, telling it to sync the repo to sync.automerge.org by passing in that URL to the adapter's constructor.
Finally, add the initialized network adapter to the list of network adapters in the Repo's initialization, alongside the existing BroadcastChannelNetworkAdapter.
Solution
//...
import { BrowserWebSocketClientAdapter } from "@automerge/automerge-repo-network-websocket";

const repo = new Repo({
    network: [
        new BroadcastChannelNetworkAdapter(),
        new BrowserWebSocketClientAdapter('wss://sync.automerge.org')
    ],
    storage: new IndexedDBStorageAdapter(),
})
Now, when the Repo sees any changes it will sync them not only locally via the BroadcastChannel, but also over a websocket connection to sync.automerge.org, and any other process can connect to that server and use the URL to get the changes we've made.
The Automerge project provides a public sync server for you to experiment with, at sync.automerge.org. This is not a private instance, and as an experimental service has no reliability or data safety guarantees. Feel free to use it for demos and prototyping, but run your own sync server for production apps.
To see this in action, open the same URL (including the document ID) in a different browser, or on a different device. Unlike the local-only version, you'll now see the data updates synced across all open clients.
Network Not Required
Now that the Repo is syncing changes remotely, what happens when the websocket connection is unavailable?
Since the repo stores documents locally with the IndexedDBStorageAdapter, methods like Repo.find will consult local storage to retrieve/modify documents, so clients can create new documents while disconnected, and any clients who've already loaded a given document will still be able to make changes to it while offline.
Once connectivity has been re-established, the Repo will sync any local changes with those from remote peers, so everyone ultimately sees the same data.
Next Steps
Congratulations! You've built a local-first, offline-capable app that supports multiplayer collaboration locally and over the network.
If you're hungry for more: